Sidechain compression in Ableton Live (4 techniques)
- Mixing
- 23.08.2022
- 5 min

If you make electronic music, you’ve most likely heard about sidechain compression since most producers use it.It’s a great technique to use when two sounds are completely overlapping each other, for example, a kick drum and a bass sound playing simultaneously. Sidechain compression is really just volume automation, but there are a few different ways of attacking it.
First of all, it is worth mentioning that Ableton Live 8’s compressor has more options for faster compression settings than the compressor in Live 9, so it’s definitely worth downloading in case Ableton’s compressor is your go to device for sidechaining.
Download
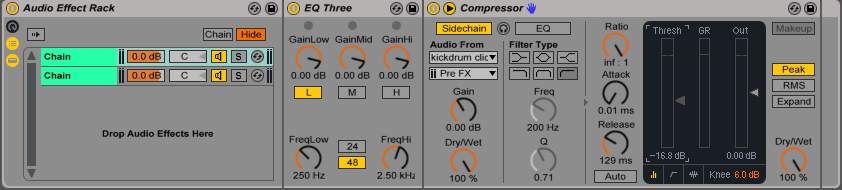
Simple part first. Drag and drop the compressor to the channel that you want to automate the volume of and enable ”sidechain” in the compressor.Secondly; choose your input channel and set it to ”pre FX”. That way the compressor won’t get the input signal of eventual processed audio.
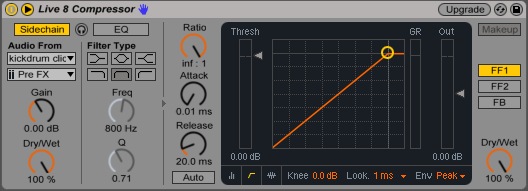
Tip: In most cases the input signal will be the kick drum so that the volume of the sound being sidechained will be reduced everytime the kick drum hits. For better sidechaining in such a case – use a short click for the input signal instead of the actual kick drum. That way you’ll gain more control over the sidechain compression envelope, so you can apply super fast release settings for a better volume relation between the kick and the sound you’re sidechaining.
Usually you want to use the fastest attack setting and the highest ratio for sidechain compression, but it all depends on what kind of sidechaining you are going for.
An attack setting of 0.01 ms will guarantee an immediate comressor response, but occasionally this can produce unwanted clicks due to such a fast drop in amplitude so you might want to adjust it in some scenarios. Also try changing the lookahead time of the compressor if you are getting unwanted clicks. This will delay the input signal so that the sound is sidechained a few ms before the kickdrum hits.

The release time of the compressor determines how long it takes for the volume to reach its original value, so this is the parameter you want to focus on most of the time since it shapes the rhythm.
Threshold determines the amount of volume reduction, along with ratio. It’s all very simple, just play around with the compressor settings and you’ll figure it out pretty quickly.
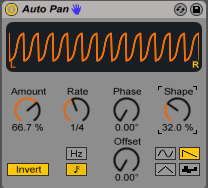
If you just want some very basic and simple sidechaining you can use the Autopan device, it’s super handy but not as configurable as using a proper sidechain compressor. The good thing about using Autopan for volume automation is that you don’t need an input signal unlike the compressor, so this becomes useful in case you want to freeze the track to save some CPU or if you just feel like a sidechain compressor is a bit too fancy for the purpose.
Sometimes sidechain compression just doesn’t do it. Manual volume automation can therefore be useful if you want 100% control over the amplitude. Here is how I like to set up an audio effect rack for this kind of automation:
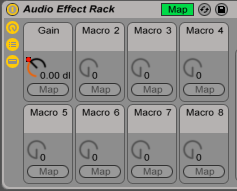
1. Start with dropping a Utility device on the channel you want to automate the volume of. Then, select the device, right click and press ”Group” (⌘G on mac, ctrl G on PC).
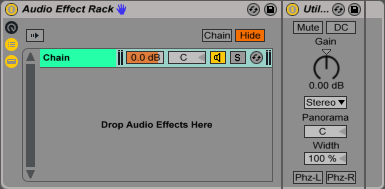
2. Now, right click the gain parameter and map it to a macro control.When you do this the macro control section should pop up. Otherwise it is located just below the on/off button of the audio effect rack.
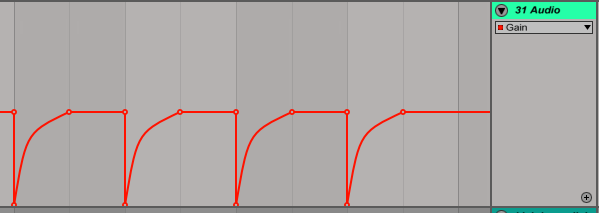
3. Draw your volume automation. Make sure the lowest points of the automation curve are at the minimum value.
4. Now, instead of dragging the lowest points of your volume automation curve up and down to adjust the amount of volume reduction, simply open up the map section in the audio effect rack (highlighted green in the picture).
This section should now show up:
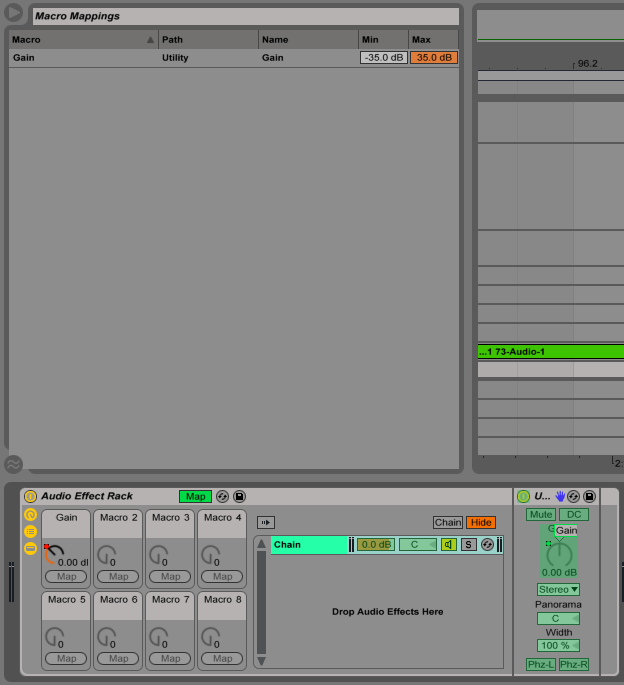
If it doesn’t appear, simply click the arrow in the top left corner of Ableton.
Now you can see that the macro control for the utility device appears at the top. All you have to do now is increase the macro control’s min value to adjust the volume reduction amount. Simple!
If you don’t want to sidechain the entire sound, just a specific frequency range, you can use EQ Three or Multiband Dynamics for this technique (doesn’t really matter, same principle).I mostly use this technique if I only want to sidechain the sub and or low mids of a sound.
Drag and drop EQ three to your channel and make it an audio effect rack (⌘G).Disable the mid and high bands, like so:
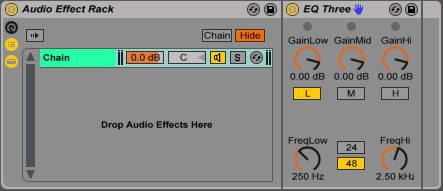
Duplicate the chain but this time, enable the mids + highs and disable the low band.
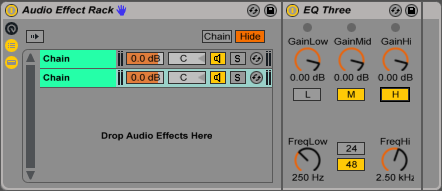
Tip: Map the low-frequency parameter in both devices to a common macro control for easy adjustment off the low bands cutoff points. You can do the same with the high-frequency parameters if you want to sidechain the mids and highs individually too.
Now, drop a sidechain compressor after the EQ Three that only has the low frequency band enabled (do this if you want to sidechain the low frequencies only. You can of course drop the compressor after the EQ Three that only has mids and highs enabled if you specifically want to sidechain the mids and highs. Experiment!). Select your sidechain compressor’s input signal and set up the compressor as you normally would for sidechaining.
If you want more sidechaining options I suggest you check out these VST plugins: Volume Shaper, Kickstart, LFO tool.

Interviews
Timofey Reznikov, the Grammy-nominated producer behind chart-toppers and platinum productions by artists like David Guetta, Jack Back, DVLM, and many more, invites you into his studio. In this video tutorial, Timofey shares his step-by-step process in producing a Tech House track from start to finish using solely Ableton Live and samples from illements library. Timofey […]

Mixing
Mixing and sound designing drums There are countless ways to create and mix the drums in a track since it all depends on the genre and what purpose the drums have in the mix. In a downtempo ambient track it is probably best not to compress and distort the living hell out of a drum […]
Mixing
If you make electronic music, you’ve most likely heard about sidechain compression since most producers use it.It’s a great technique to use when two sounds are completely overlapping each other, for example, a kick drum and a bass sound playing simultaneously. Sidechain compression is really just volume automation, but there are a few different ways […]