Production and Mixing Tips for Better Drums
- Mixing
- 26.08.2022
- 12 min

There are countless ways to create and mix the drums in a track since it all depends on the genre and what purpose the drums have in the mix.
In a downtempo ambient track it is probably best not to compress and distort the living hell out of a drum kit but it can be a useful technique for other more energetic genres where you want the drums to stand out more and be like a punch in your face.
However, there is more to a great drum sound than just processing of different kinds.
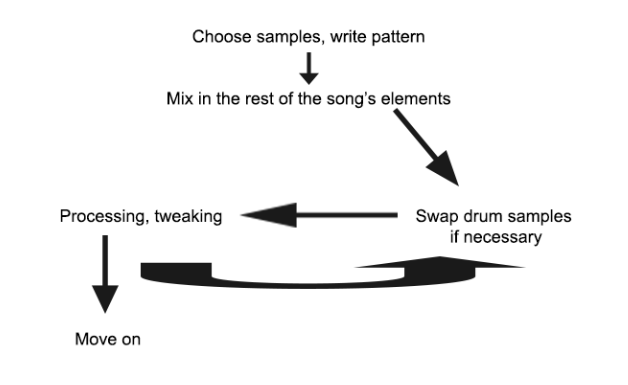
Starting with great sounds and great patterns is essential in order to achieve the right drum sound. So, where do we start?
If you start your track with making a drum loop, try to have an idea of how you your drums should sound, what purpose the will serve in the mix and what kind of vibe you are going for with the track.
It is an option to use a reference track and compare your drums to that or you can just experiment with different sounds. Choose samples according to this and lay down your pattern.
To make the drum pattern sound ”full”, make it at least a 4- or 8-bar loop and ask yourself: how would an actual drummer go about playing this drum pattern? Keep this in mind and try to mimic a real drum kit by alternating the different samples velocity, length and tone over time. You can make variations, fills etc. – anything to make it sound less monotonous.
Now you can start writing the other the other elements of the track around the drum pattern. A good starting point is the bass line since it is crucial that it sits nicely with the kick drum in the mix and that it compliments the drum pattern groove wise.
Once you have several elements going on in the mix, such as bass, pads, chords etc and you have made these sound more or less the way you want them to, you can lay your focus on the drum mix and it’s groove.
At this point you might have realized that some of the drum samples don’t fit in the mix, so try hot swapping these with new ones while the track is running. You want to fill mix space where there’s a lack of frequency content. Overlapping other frequencies will leave you with a muddy sounding mix, but a lot of this can of course be handled with EQ, compression etc.
Tip: When choosing a new sample; listen to its qualities and how those contribute to the groove.
So basically, the workflow for making the drums could look something like this:
Layering samples is a great way to beef up your drums and create something unique that is your own. Say that you like the transient of a snare sample but the tail is rubbish, or maybe you like the tone of an acoustic kick but it doesn’t have enough impact in the sub region.
This is where layering is a great tool as you combine samples and get the best of both worlds.
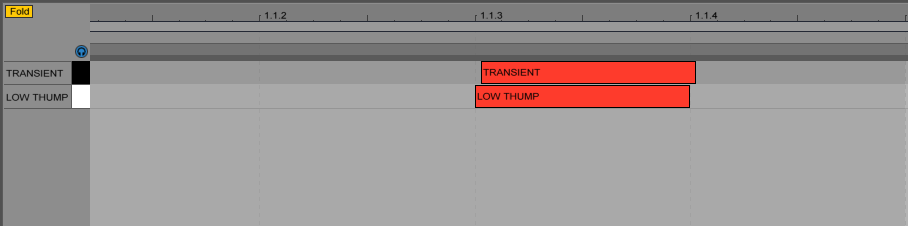
A good way to start of layering is to select, say a snare, that has a good thump in the 200 Hz area that you like, but maybe this is the only good thing about this snare. The transient is way too sharp and the tail is garbage.
Start off with laying out a pattern for the snare and press loop. Now, you want to correct the transient and the tail, so you’ll need one or more samples for this. Decrease the attack of the first snare you selected and select a second snare with a good sounding transient. Lay out the same pattern for this snare, but instead, decrease the sustain and decay of the sample. You only want the transient, the initial ‘crack’ of the snare.
Now, start playing around with the position of one of the samples. Listen for where they glue together and start sounding like one.
If you need a tail as well, find a snare with one that sounds good and repeat the same process. The tail however should have a long attack and a release of your preference.
Adjust the positions of the samples until you find something that sounds consistent. It’s a good idea to go back and forth between the decay, sustain and attack settings of the samples since that is what really shapes the layering.
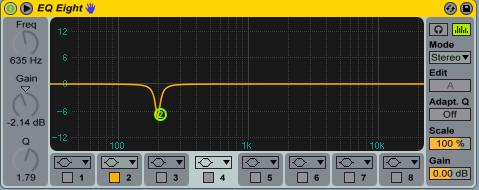
Apply low pass and high pass filters according to their frequency content. The low thumpy snare should have a low pass filter applied to it with the cutoff set somewhere above the fundamental frequency. The transient only needs the mids and highs, so apply a high pass filter to it and set the position somewhere above 300 Hz, same thing goes for the tail. Play around with the cutoff points of the filters as well as the amp envelopes and figure out where the puzzle pieces should be placed, it’s all a matter of attention and listening.
Once you have a layered sample that you like, apply some gentle compression to glue all the samples together.
Maybe you’ve made a drum pattern that sounds good when soloed, but when in context it seems to lack groove.Adding recorded drum loops to the equation can give you great results. Perhaps a shaker, a break or a percussive loop to fill in what is missing.
Since the loops you add are in many cases recorded drum sessions you add a human touch to your pattern. Our brains used to differences and randomness in sound and they are extremely good at noticing small differences in sound length and the time in between sounds, so when you are letting the computer quantize the notes so that they are perfectly on time it starts to sound unnatural and becomes fatiguing.
Don’t be afraid to add a tiny bit of groove to your pattern or a drum loop, it’s a good thing psychologically!
However, a thing to keep in mind is that if your own drum pattern already has huge sounding drums, it will be difficult to mix with a massive sounding drum loop. Use something that doesn’t take up too much space, perhaps a shaker, a hat loop or a recorded break where the drummer doesn’t smash the drums with the force of a thousand suns.
And remember: high pass filtering can be handy for noisy loops.
Since the kick and the snare are the two parts ”driving” the track drum wise, it is best to process them first of all drums and mix everything else around these.
Focus on the low end first of all. Let nothing but the bass line play while you’re mixing the kick and snare and start doing surgical EQ:s in the areas where the kick and snare have their thump-frequencies. EQ changes the phase of sounds, and at this point you want to fix eventual problematic phase problems in frequencies below 300 Hz.Sweep a narrow subtractive EQ around these frequency areas and listen for where the kick and snare start sounding consistent together. An EQ should be applied to the kick and snare individually and have different necessary settings of course.
There are other techniques than EQ to use when correcting phase problems. You could use Ableton’s Utility Device, which will completely flip the phase of a sound. You could also offset the sample or adjust its pitch.
Tip: If you encounter phase cancellation (where frequencies cancel each other out), try offsetting the two problematic sounds from each other and listen for where they sound the weakest together. This is where you’ll have maximum phase cancellation. Once you’ve found this point, use the Utility device to flip one of the samples and voila – the phase has been inverted and the cancellation is now at minimum.
If you are a beginner producer, it is likely that you’ll use a lot of compression to make your drums sound loud and punchy, but there are better techniques for shaping drums than compression.
If you listen to a track by, for example, Knife Party (Since we are talking about dance music after all and because Rob Swire is an incredible sound engineer), you’ll notice that the drums don’t have super sharp, over compressed transients, because it is not necessary. A kick or snare has most of its impact in the low end, so be careful not to make transients sharper than they need to be in the mix.
In Ableton, drum transients can much more gently be shaped using envelopes in devices such as Simpler. Use the decay, attack and sustain parameters the same way you would use a compressor, I can guarantee that it will sound better than if you were to force the sound through a brick wall limiter/compressor. Of course, combining this technique with the right compressor settings gives you even more control over your drum transients.
Before properly starting to work on each individual drumsample or loop, select all your drum channels and place them in a group channel. Then, split the drum parts into four groups: hats and cymbals in one group, percussion in one group, toms in one group, kick and snare in one group.
This way you’ll be able to process highs, mids and lows individually, something that makes mixing a lot easier.
A common technique used for gluing the drum kit together is to apply some parallel compression to the drum group. Parallel compression lets you preserve some of the original dry signal mixed with the wet, punchy signal from the compressor and the result is some very natural sounding compression.
Parallel compression often uses a fairly low threshold together with a high ratio, long attack and a fast release time. Adjusting the dry/wet signal determines how much of the compressed signal you want.

For a good, realistic sounding grum kit (even if the drums are digital), reverb is the key. No drum kit could ever be recorded without any room reflections bleeding into the microphones right?
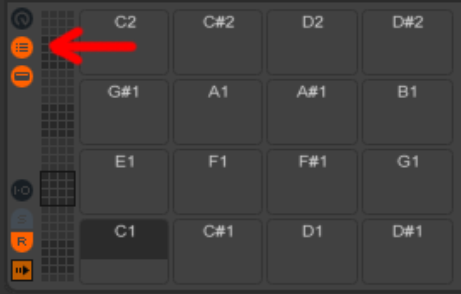
If you are using Ableton’s drum rack you can open up the chain section to the left and from there you’ll be able to access the drum racks own return/send chains.
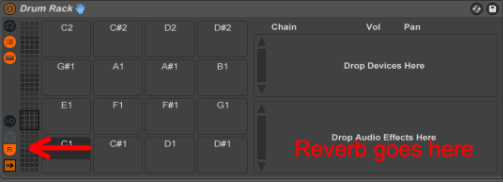
Once you’ve done this you’ll be able to send Different amounts of reverb to each individual sample in the drum rack rather than sending the whole kit through a reverb. This is quite handy since some sound files might have reverb imprinted in them already or maybe because you simply don’t all of the elements to have the same amount of reverb applied to them.
However, many times it is a good idea to wait with applying reverb to sounds until you start doing the final mixdown.
Make sure everything has its own space first and make sure to use a good reverb. Low quality reverbs usually add muddiness rather than space, depth and consistency to the mix.
One of the key ingredients for making interesting sounding drums is clever use of the stereo field. Imagine that you’re standing in front of a drum kit with a drummer playing.
Naturally the sound of the hi hats would come from the right, the ride cymbal from the left, toms from right to left and kick and snare from the center.Of course, room reflections would cause sounds to come from different directions as well and this is where you would use overhead microphones in a recording studio, but since we are working with digital drums we don’t have any reflections or natural space. Instead we use panning and reverbs.
Panning hi hats and cymbals the left and right, as well as toms and percussion, will make the drum kit sound ‘bigger’ and much more natural. You’ll rarely hear a dead center drum kit in a mix. Listen to the position of drums in mixes that you like and try to copy those drum positions into your own track.
Adding the right frequency content to the stereo field will always make the mix sound bigger, especially if the added frequencies are above 6 – 7KHz (which is were hi hats and cymbals have their frequency content).
Now you should have some of the basics for making good sounding drums! Keep in mind to treat your drums as an actual acoustic drum kit, not processing, but groove, space and rhythm wise. Drums are one of the most important elements in a mix, and with great drums come great results. Don’t rush drum processing, it takes a lot of time and practice to get it sounding the way you want, but it is all worth it in the end.

Interviews
Timofey Reznikov, the Grammy-nominated producer behind chart-toppers and platinum productions by artists like David Guetta, Jack Back, DVLM, and many more, invites you into his studio. In this video tutorial, Timofey shares his step-by-step process in producing a Tech House track from start to finish using solely Ableton Live and samples from illements library. Timofey […]
Mixing
Mixing and sound designing drums There are countless ways to create and mix the drums in a track since it all depends on the genre and what purpose the drums have in the mix. In a downtempo ambient track it is probably best not to compress and distort the living hell out of a drum […]

Mixing
If you make electronic music, you’ve most likely heard about sidechain compression since most producers use it.It’s a great technique to use when two sounds are completely overlapping each other, for example, a kick drum and a bass sound playing simultaneously. Sidechain compression is really just volume automation, but there are a few different ways […]